Grafana is an open-source platform that provides real-time insights into operations. It has been extremely useful in customer environments where they were needing a solution that could be displayed on a centralized monitor (typically in something like a Network Operations Center).
While Grafana provides a hosted service, it can also be deployed to Linux, macOS, and Windows machines. Additionally, Grafana provides two different Docker images – Alpine (preferred) and Ubuntu.
Grafana’s documentation only covers VM-based or container-based deployments, and the container-based deployments still assumed you were deploying to some type of underlying managed hardware. Deploying VMs in a cloud environment and ensuring high-availability requires additional infrastructure, configuration, and maintenance. Instead, I wanted to leverage Azure’s Web Apps for Containers so that I could have a complete PaaS solution that scaled as needed.
The Problem(s)
First Problem: Grafana provides the necessary instructions to deploy the application to a container and Grafana, by default, uses Sqlite for its database. Grafana provides the option to leverage PostgreSQL or MySQL, but the goal was a complete PaaS solution – one that didn’t involve VMs.
Second Problem: If I deployed Grafana as-is (using the built-in Sqlite database configuration), the Sqlite database (and plug-ins) would be lost as soon as the container is reset.
Third Problem: Like the second problem, the Sqlite database and plug-ins are localized to the single container instance. This doesn’t help when looking to scale the application.
Solution (or I thought): Azure provides the ability to mount blob storage to a container (more on how to do this below). However, when following Azure’s instructions on mounting the blob storage and configuring Grafana, the container wouldn’t start. Examining the logs revealed the error message:
lvl=eror msg="Server shutdown" logger=server reason="Service init failed: Migration failed err: database is locked"
So now what? Follow below for the complete solution in deploying Grafana to Azure App Service using Web Apps for Containers.
Deploying Grafana to Azure’s Web Apps for Containers
Deploying Grafana to Azure’s Web Apps for Containers is actually a pretty simple process once you figure out the necessary requirements. The steps at an overview are the following:
- Create a storage account
- Create an Azure Files share
- Instantiate an empty Sqlite database and upload it
- Create a Web Apps for Containers Azure App Service
- Mount the Azure Files share
- Set an environment variable
Aside from waiting on Azure to complete the deployments, the process should take approximately 15 minutes.
Let’s get started.
Create a Storage Account
Begin by creating an Azure Storage account.
Because this is a production environment, you’ll want to, at a minimum, create the account with RA-GRS and a Hot access tier.

Just to be on the safe side, I also enabled File share soft delete with a 90-day retention policy.
All other options were left as their defaults.
Create an Azure Files Share
Originally, Azure allowed blob containers to be mounted. However, the Azure product group determined that maintaining compatibility between blob storage mounts and containers was too costly in development time and resources. Therefore, blob storage mounts have been deprecated to Read-Only. This change forces us to use an Azure Files share instead.
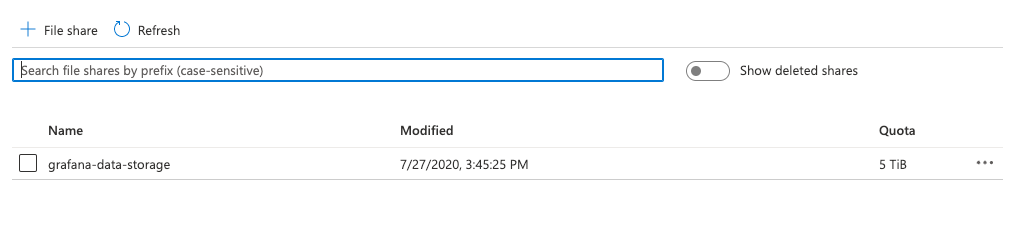
Navigate to your newly created storage account and scroll down to File shares.
Click on the + File share button.
For the Name, name it whatever makes sense to you. I chose to name it grafana-data-storage. Set the quota or leave it blank (leaving it blank will default the quota to 5 TB).
Instantiate an Empty Sqlite Database and Upload It
Unfortunately, as we saw above, if we leave Grafana to create the database, it will run into a database lock error. To solve this problem, we’re going to create a Sqlite database manually and then, using the Azure CLI (e.g. az storage copy), we’re going to upload the database to our file share.
On a Windows machine, you’ll need to run all four commands (provided you’ve already installed choco). If you are on macOS, Sqlite is already installed and, therefore, you can skip the first command.
Additionally, you’ll need to ensure that the Azure CLI is installed.
choco install sqlite
sqlite3 grafana.db 'PRAGMA journal_mode=wal;'
az login
az storage copy -s .\grafana.db -d https://<storage_account>.file.core.windows.net/<file_share> --subscription <subscription_name>
After ensuring Sqlite is installed, you will use Sqlite to instantiate a new Grafana database (e.g. grafana.db). You may want to ensure the file was created successfully with the PRAGMA flag. The initial file size should be 4Kb.
Next, using the Azure CLI, you will login to your account.
Finally, replacing <storage_account>, <file_share>, and <subscription_name>, you will need to insert the appropriate values (e.g. the name of your storage account, the name of your file share – mine was grafana-data-storage – and your subscription’s id or name).
This will use azcopy to upload your fresh Grafana database to your file share.
Create a Web Apps for Containers Azure App Service
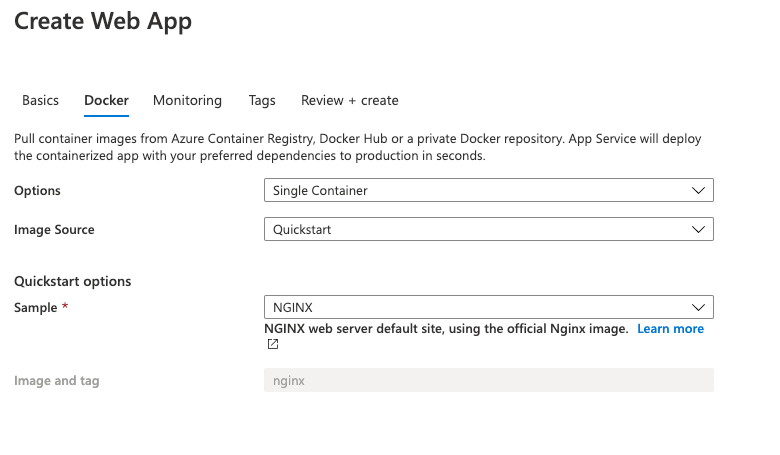
Create a new Azure web application that publishes a Docker Container and choose Linux for the OS. Choose a pre-existing Linux App Service Plan or create a new one.

For the Docker options, we’re going to leave the defaults for the moment. We’ll update this later once we have our environment fully configured. All other options can remain the default.
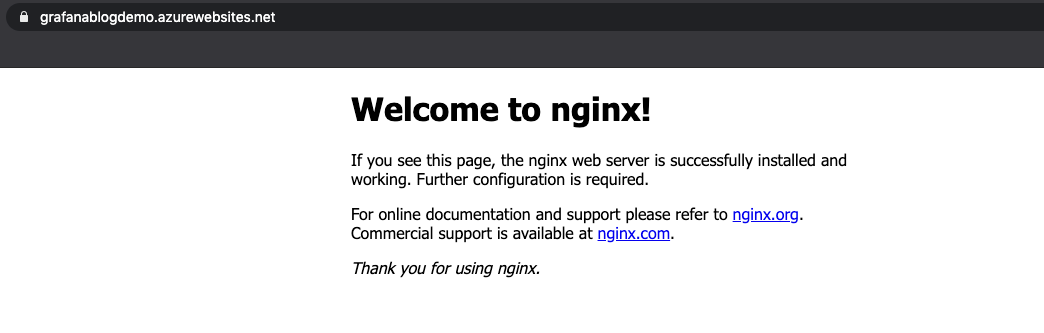
Once the Azure Web App has been successfully configured, ensure you can access it by the app service URL. You should see the nginx message.
You will now need to configure the container to use the Azure File share we created earlier.
Mount the Azure Files Share
Back in the portal, on the App Service’s blade, click on Configuration, then Path mappings.
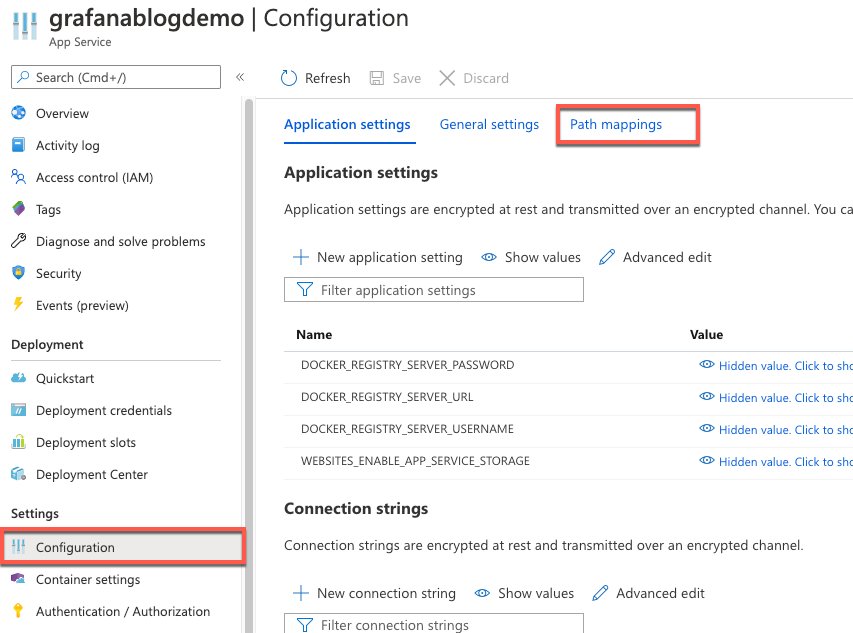
Now click on + New Azure Storage Mount
Name the storage mount whatever you’d prefer and choose the Storage Account you created above, Azure Files for Storage Type, and the Azure File share for the Storage Container. Finally, most important, for the Mount path, type in /var/lib/grafana. NOTE: The mount path MUST be exactly this path.
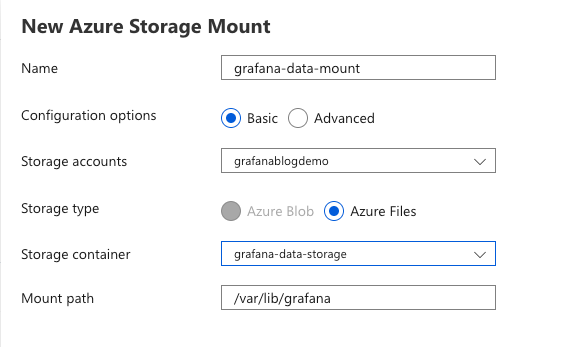
Click OK then Save at the top.
We just attached our Azure File share to our container and it will be mounted at /var/lib/grafana which is Grafana’s default file path for the database and its plugins. By doing this, our container/app service can scale to multiple instances while sharing the same database and plugins path. Additionally, should our container happen to be restarted for any reason, none of our settings will be lost.
Set an Environment Variable
Grafana, as previously stated, will store the database in our /var/lib/grafana mount path. However, it will not use the PRAGMA flag that we used earlier for accessing the database and, therefore, will continue to experience the database locking. Grafana allows us to overwrite default configuration variables by leveraging environment variables. So, we’re going to use Grafana’s default database connection string, but append the necessary flag.
If you are not there already, click on the Configuration blade once again (you should still be on the Configuration blade from the previous step).
Now, choose Application settings and add a + New application setting.
For the setting, enter the following:
Name: GF_DATABASE_URL
Value: sqlite3:///var/lib/grafana/grafana.db?cache=private&mode=rwc&_journal_mode=WAL
Deployment slot setting: unchecked

Make sure you click Save.
Set the Container Image
Now that the environment is configured, we simply need to update our container’s image source.
In the App Service blade, under Deployment Center, choose Settings.
By default, the Full Image Name and Tag will be set to nginx (which was set when we created the App Service). Change the container type to Single Container, the registry source to Docker Hub, and the image to grafana/grafana and click Save.
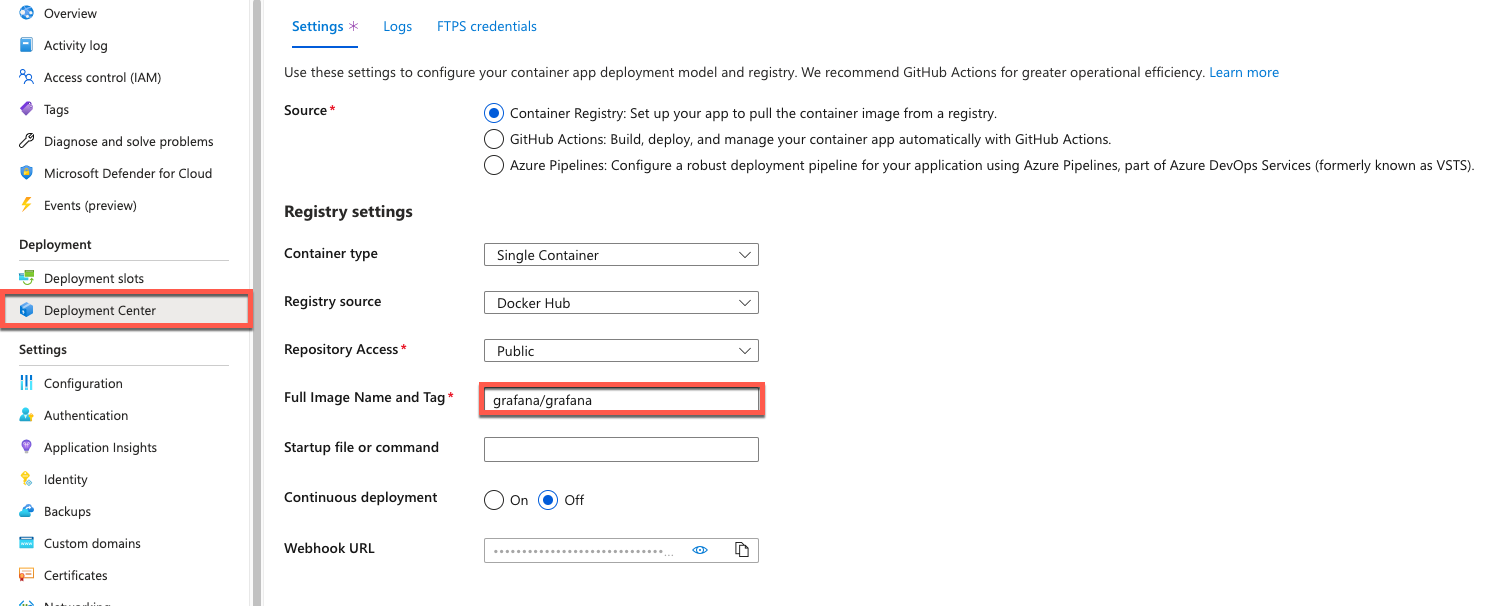
It may take a moment for Azure to pick up the changes once you submit them. You can click Refresh a few times and scroll down the logs (next to Settings at the top of the blade) to ensure the container was deployed correctly.
Additionally, if you visit your site’s page, you should see the Grafana login page.

Conclusion
That’s it! Pretty easy wasn’t it?
Now, you have Grafana deployed to Azure Web Apps for Containers. By utilizing pure PaaS for deployment, your Grafana instance is redundant and can scale to support the necessary load.
One Last Thing
It is often believed that running a container eliminates the need for disaster recovery planning. I would be doing a disservice if I didn’t call your attention to the fact that this belief is incredibly wrong. While you are running Grafana on a container and the container can always be redeployed, don’t forget that your data is on a storage account that has been mounted to the container instance. The container will not need to be backed up, but the storage account will.
It is highly recommended that you configure an Azure Recovery Vault to backup your Azure File shares. Here’s a tutorial on how to do it.
Your blog helped me!! I was stuck for database locking error. I wasn’t aware of Environment variable for the database URL. Thanks a ton!!!
Glad it helped!
you are an real badass.
Thanks for the help.
Thanks!
Thanks. It appears like the ‘”Set the Container Image” option is no more available in Azure portal. I could not find how to update container images to grafana/grafana from Azure portal and has to use azure cli.
Sorry, about that. That’s one of the issues with writing posts about technology–it’s always changing.
I’ve updated the instructions and image to reflect the portal’s changes.
Thanks, it’s worked for me,
one question, i need to open report directly without login, how to do that
also unable to see grafana.ini filre in file share
Thanks in advance
In this post, the fileshare only holds the database for Grafana—not the grafana.ini. The grafana.ini is contained in the container. You would need to either modify the container itself or upload a copy of the .ini file to the fileshare and map it during the container using the Startup command in the Azure portal.
Hello,
If I want to install a plugin, I just need to put it inside the plugins folder of the File Share ?
Technically, yes. However, I haven’t tested it so I can’t confirm.