Installing WordPress
You now have the PaaS infrastructure to support a high-available instance of WordPress. Let’s go ahead and install WordPress onto our App Service.
One of the benefits of using the Linux App Service is that most of the system prerequisites, including the basic PHP libraries, are already available to us. Additionally, apache has already been configured. Unless we are using some obscure WordPress plugins, you won’t need to rebuild PHP and we can leverage what has already been supplied to us by the Azure team.
Connect to the Remote Terminal
Most of the next steps are accomplished through the remote terminal (SSH) of our Web App.
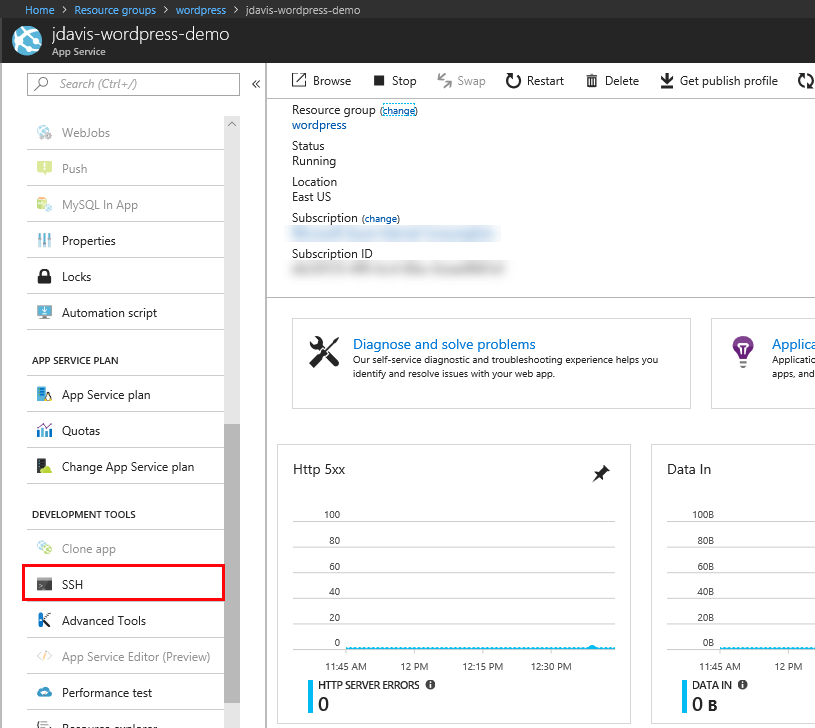
- Navigate to your Web App (App Service) blade.
- 3/4 of the way down on the left menu of the blade, you’ll see SSH. Click on it.

- In the SSH blade, you’ll see a link that reads Go. The current version of the WebSSH client has some issues with browsers in standard mode. If you are using Edge, right-click on the link and select Open in new InPrivate window. If you are using Chrome, right-click on the link and select Open link in incognito window.
Download WordPress
Change into a temporary directory and then download the compressed release:
cd /tmp
curl -O https://wordpress.org/latest.tar.gz
Extract the compress file to create the WordPress directory structure:
tar xzvf latest.tar.gz
We will move these files over to the main web site root folder in a bit. But, before we do, let’s add an .htaccess file and set it’s permissions.
touch /tmp/wordpress/.htaccess
chmod 660 /tmp/wordpress/.htaccess
Using the .htaccess, we can override some of PHP’s default environment variables so that our WordPress instance’s performance is optimized.
Using vim open up the .htaccess and add the following content (you may need to read up on how to use the editor):
php_value max_input_vars 3000
php_value max_execution_time 60
php_value post_max_size 32M
Let’s copy over the sample configuration file to the filename that WordPress actually needs:
cp /tmp/wordpress/wp-config-sample.php /tmp/wordpress/wp-config.php
We’ll also make the upgrade directory so that WordPress doesn’t run into permissions issues when trying to do this on it’s own following an update to the software:
mkdir /tmp/wordpress/wp-content/upgrade
Now, we’re ready to copy our WordPress over to the working directory:
cp -a /tmp/wordpress/. /home/site/wwwroot
Finally, let’s delete Azure’s default landing page:
rm /home/site/wwwroot/hostingstart.html
Configure the WordPress Directory Permissions
We will set the setgid bit on each of the directories within the document root. This causes new files created within these directories to inherit the group of the parent directory instead of the creating user’s primary group. This just makes sure that whenever we create a file in the directory on the command line, the web server will still have group ownership over it.
We can set the setgid on every directory in our installation by typing:
find /home/site/wwwroot -type d -exec chmod g+s {} \;
There are a few other fine-grained permissions we’ll adjust. First, we’ll give group write access to the wp-content directory so that the web interface can make theme and plugin changes:
chmod g+w /home/site/wwwroot/wp-content
As part of this process, we will give the web server write access to all of the content in these two directories:
chmod -R g+w /home/site/wwwroot/wp-content/themes
chmod -R g+w /home/site/wwwroot/wp-content/plugins
This should be sufficient right now. Some plugins and/or procedures made need some additional tweaks.
Configuring WordPress
We’ll now need to make some changes to the main WordPress configuration file.
We we open the file, we’ll first need to add some secret keys in order to protect our installation. WordPress provides a secure generator for these values so that you do not have to try to come up with good ones on your own. These are only used internally, so the more complex, the safe you are.
To grab secure values from the WordPress secret key generator, type:
curl -s https://api.wordpress.org/secret-key/1.1/salt/
You will get back unique values that look something like this (Warning: Do not copy mine below. Copy the values from your terminal.)
define('AUTH_KEY',         '6/ug+)c[P?4:hF3dAt|Qu#V6xA d?ss-,HH#Q++xE-0M0%W,PTU 3$I|fX*S;;`m');
define('SECURE_AUTH_KEY',  'Wv.6<h8o.F)(VG@x^~@NvwrKI%4X+DxG%]3*PB]Isr1rf6-/5%#HJ;_}Z|m}%}J3');
define('LOGGED_IN_KEY',    '1Ujh+U9)A*!o4);?+3w/#.P0M0F0YdpDkyh yjz%,!Q`Gaf8ri ::-D9Y6ti/V3j');
define('NONCE_KEY',        'SKZ_f3)<8OdaIU0O67P|?p|=tR =k=l=/c2}=|vFM*j%[?t%zwMWDg.+RO*I|B]J');
define('AUTH_SALT',        'u1B#g9kr&iT-?1+goui2cQwC*bj}hH=*N`gR-aDB+`GmD8/w+xqG(s7b&*j&|B@S');
define('SECURE_AUTH_SALT', 'yyPrE+|[RUvS(z!Dry|zH)U]Y@|[6o+jiAa9kX;qZE>k*/}OAg-?rdaia6>fr~BS');
define('LOGGED_IN_SALT',   '!||&L>B3|bIA-!$vxOZ8*,{-`/U{^%Qf*%r;SOiwn|I[L~E!~nPP+!<g( %*A)y*');
define('NONCE_SALT',       'A9|uE7].zH]D@`p+sbn> f_|%W {vR,J RV*cp=^_v-6OI`YLQX6DLDz<>U%, MK');
Again, copy these (highlight, right-click and copy) so that you can paste them into the WordPress configuration file.
Now, let’s edit the configuration file using vim.
vim /home/site/wwwroot/wp-config.php
Find the section that contains the dummy values for those settings above. It will look something like this:
. . .

define('AUTH_KEY',         'put your unique phrase here');
define('SECURE_AUTH_KEY',  'put your unique phrase here');
define('LOGGED_IN_KEY',    'put your unique phrase here');
define('NONCE_KEY',        'put your unique phrase here');
define('AUTH_SALT',        'put your unique phrase here');
define('SECURE_AUTH_SALT', 'put your unique phrase here');
define('LOGGED_IN_SALT',   'put your unique phrase here');
define('NONCE_SALT',       'put your unique phrase here');

. . .
Delete those lines and paste in the values you copied from the command line.
The other settings in this file reflect what we configured for our database and App Service in Azure. Find the appropriate settings and update accordingly. The settings for my particular database and App Service are reflected below. Your’s will be different.
. . .

define('DB_NAME', 'wordpress');

/** MySQL database username */
define('DB_USER', 'wp_admin@wordpress-demo');

/** MySQL database password */
define('DB_PASSWORD', '@5tr0ngP@ssw0rd!');

/** MySQL hostname */
define('DB_HOST', 'wordpress-demo.mysql.database.azure.com');

. . .
Finally, find the line define('WP_DEBUG', false);. After this line, add the following two lines:
. . .

define('FS_METHOD', 'direct');
define('WP_MEMORY_LIMIT', '96M');

. . .
These two lines will allow WordPress to write to the filesystem directly as it needs and increases the allocation for WordPress memory consumption, respectively.
Save and close the file when you are finished.
Complete Installation
Now that the server configuration is complete, we can complete the installation through the web interface.
In your web browser, navigate to your Web App (your’s will be different than mine):
http://jdavis-wordpress-demo.azurewebsites.net
Select the language you would like to use:

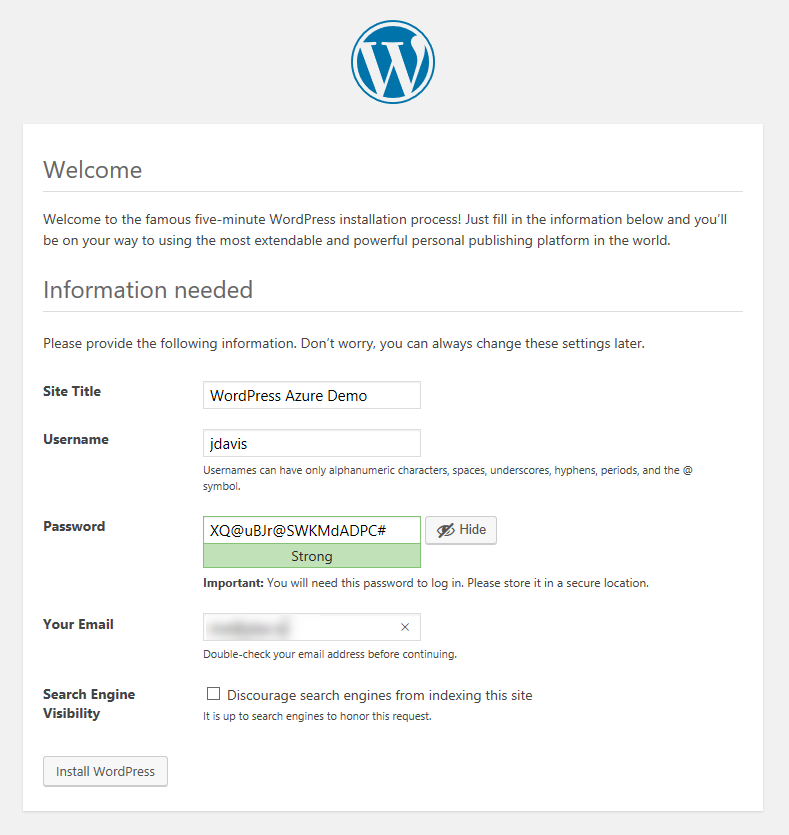
Next, you will come to the main setup page.
Select a name for your WordPress site and choose a username (don’t choose something like “admin” for security purposes). A strong password is generated automatically, but you can choose your own. Enter your email address and select whether you want to discourage search engines from indexing your site:
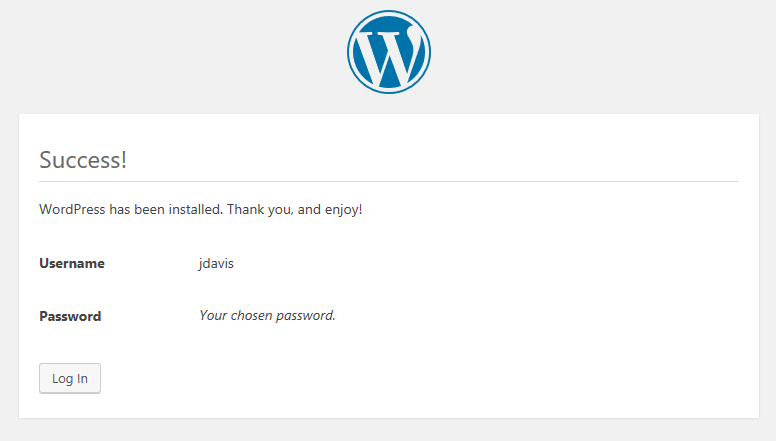
When you click Install WordPress, you will be taken to a page that prompts you to log in:
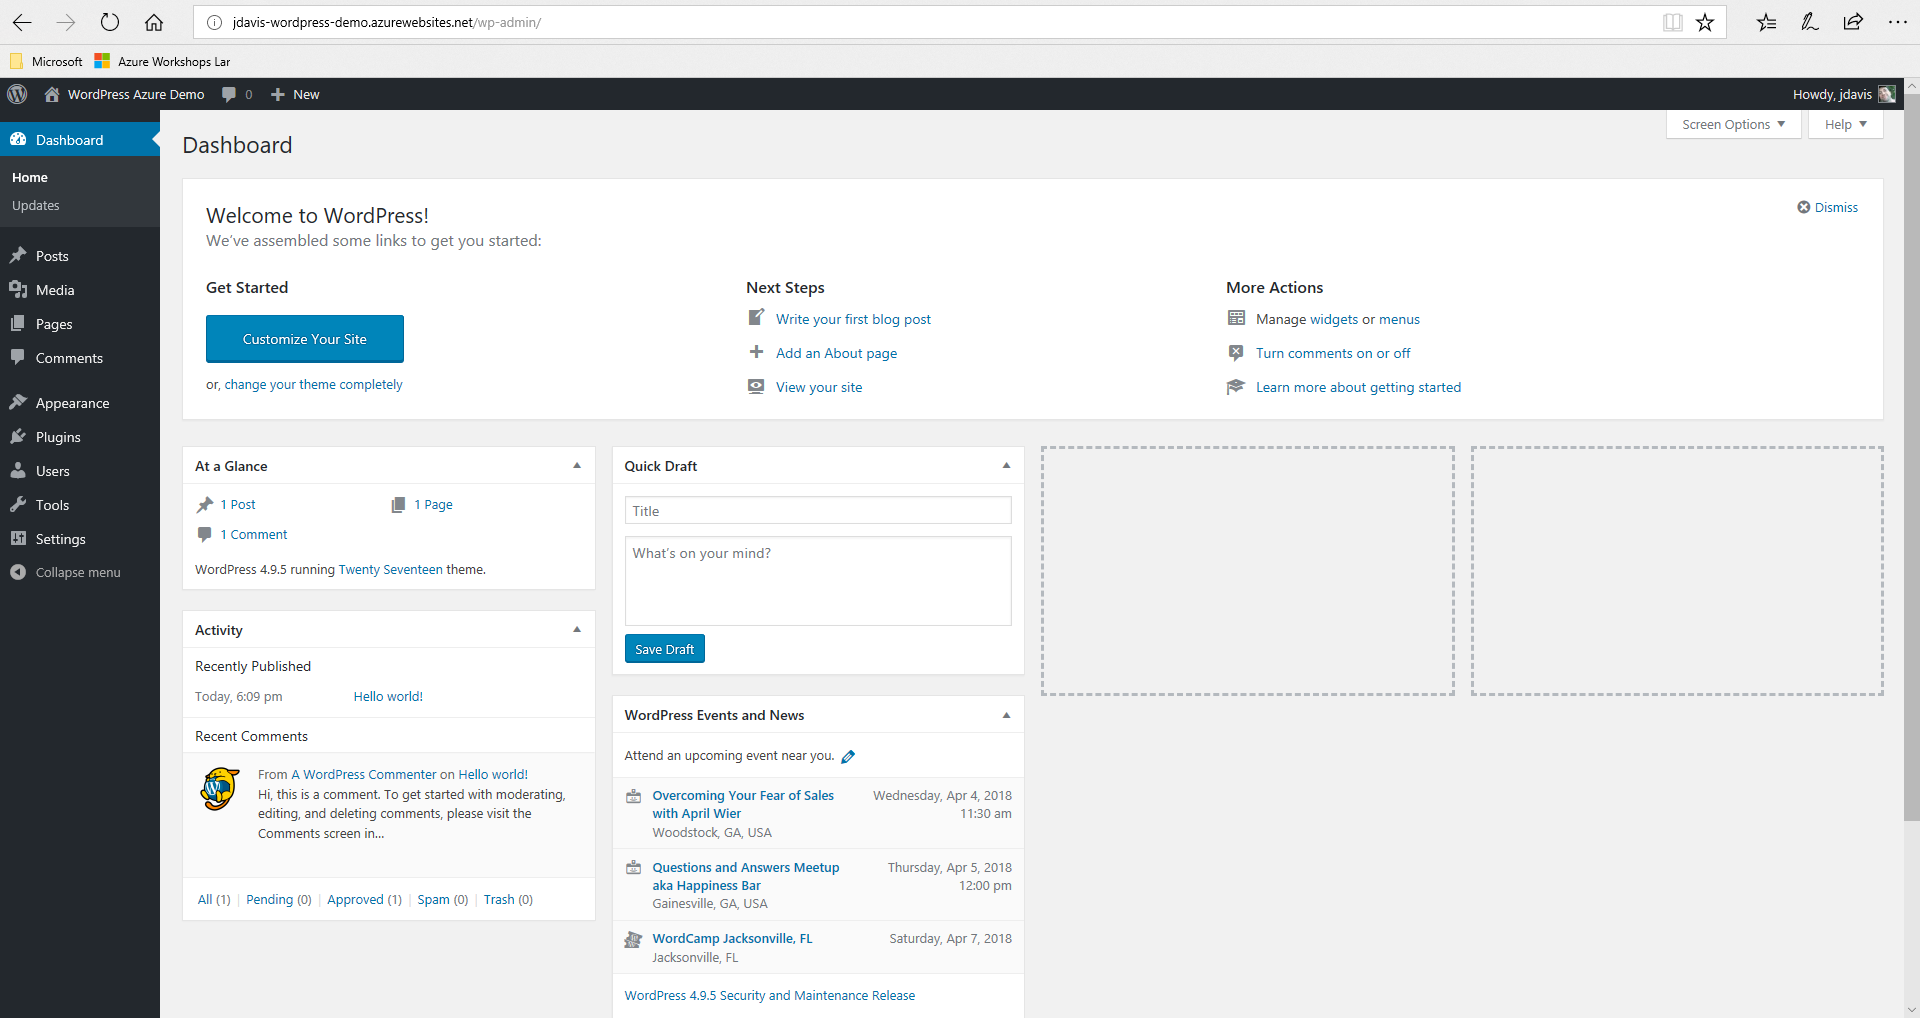
Once you log in, you will be taken to the WordPress administration dashboard:
Configure Mail
By default, WordPress attempts to use the built-in PHP mail libraries for sending email. However, Azure does not allow the ability to send mail from its environments in order to prevent SPAM. Instead, Azure requires you to use a third-party SMTP relay server – either your’s or a provider.
For my SMTP relay scenarios, I use SendGrid. Luckily, I’m grandfathered into SendGrid’s free tier. However, SendGrid does have some cheap options for sending emails. Feel free to use whichever provider you are most comfortable with. For this demo, I show you how to incorporate SendGrid.
- From within your WordPress administration portal (login if you’ve not yet done so), click on Plugins in the left menu.
- You’ll see a list of default plugins. It is recommended that you activate Akismet Anti-Spam to cut down on the amount of SPAM comments in your blog (you will need to setup a free Akismet account, but it’s self explanatory). You can safely delete the Hello Dolly plugin.
- At the top, next the the Plugins title, click Add New.

- In the left portion of the screen, there’s a search box. Search for WP Mail SMTP.
- You should see the plugin returned as the first option, click Install Now.

- Once installed, the same button you just clicked, will turn blue and read Activate. Click it.
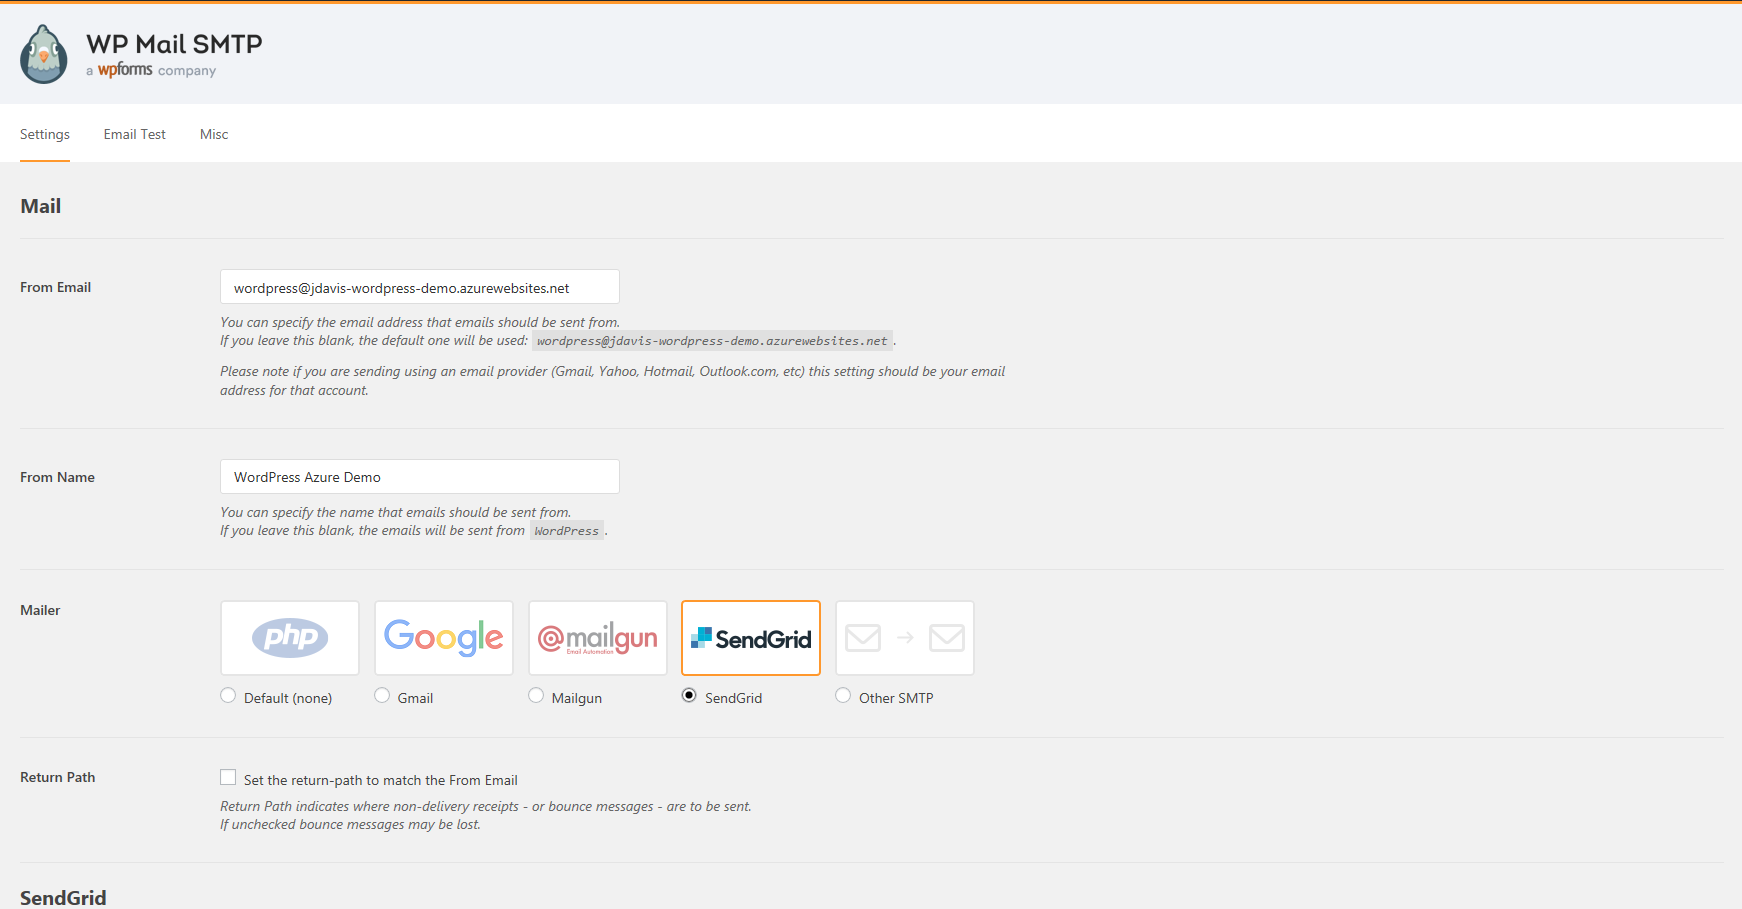
- You will be returned to the plugins page. Under WP Mail SMTP, click Settings.
- Now, you’ll be able to configure your SMTP relay server. Notice that the default is, again, PHP. You’ll need to change it to one of the other options, including a custom SMTP relay server, should you have the appropriate settings.

- Once configured, click Save Settings.
- If you’d like to test your configuration, feel free to click the Email Test menu item at the top of this page.


Nice Explanation! Thanks for sharing this valuable article with picture visually which easy to understand.
wow !!!! that guide so EXCELLENT, thanks for dedicating part of your time to create a guide so detailed and easy to understand, I really had hours looking for how to perform the process of installing wordpress in azure on the internet and none of the guides I found convinced me, but this guide is above all, thank you.
One question, if I wanted to host several wordpress websites in the same web services, creating sub folders in the wwwroot portfolio, would there be any variation in the process ?, and the configuration of the custum domain as it would be configured? or do you recommend improve creating a web services for each wordpress installation?
Thank you,
Just to clarify… a web (“App”) service and a web site are two different things. The service is the host process (RAM, CPU, etc.) in which your site is running. When you created a web site, a service was also (automatically) created for your site to run in. The service is what you are billed on. Therefore, to answer your question, you can have a single App Service with multiple websites. Install a unique instance Word Press on each site and associate a domain with each of those sites. Then, all of your sites will run in the same App Service and you’ll only have to pay for one service. Hope this helps, let me know if you have any other questions.
[…] Install WordPress on Microsoft Azure PaaS […]
In the Azure marketplace there is now a Windows Server 2016 image with WordPress that comes pre installed with MySQL, IIS & phpMyAdmin as an alternative option: https://azuremarketplace.microsoft.com/en-us/marketplace/apps/cloud-infrastructure-services.wordpress-windows-2016?tab=Overview
The post configuration guide can be found on : https://cloudinfrastructureservices.co.uk/how-to-setup-wordpress-on-windows-2016-in-azure/
Andrew,
Great job on your marketplace image. It looks pretty good if someone is interested in a single VM, Windows-based solution. However, there are a few issues, in general, with your approach.
– Windows servers require adequate licensing. Most Linux distros do not.
– This architecture, by utilizing VMs, doesn’t scale well, especially with how WP saves images and media. First, in order to scale, you would need to create a VMSS with an image. Second, you’d need to configure WP to use blob storage or attach Azure Files to the VM and configure the correct path for WP’s media. This way, all WP instances in the VMSS would have access to the media files.
– There is some performance lag with ISAPI and processing PHP within IIS. Perhaps this not a big deal for Windows shops who require Windows machines, but still exists nonetheless.
– You’re now looking at an IaaS solution with multiple components that require human maintenance and manual patching. Besides licensing, you are looking at additional costs in human resources. Most of this overhead (and cost) is eliminated with a PaaS solution.
– DevOps is slightly more complicated because you’ll now need to create additional instances for Dev, Test, Stage, etc. With App Services, you can utilize deployment slots. Then, switch environments very easily with the click of a button.
Thanks for the feedback though!
Hi Boss! I followed this and am getting Error 404, not sure what I’m doing wrong. Can you help?
Where are you getting the 404? What step?